Developing simple Web services with Apache CXF and Maven
Introduction
In this lab exercise you will develop a simple Web service using Apache CXF and Maven.
Apache CXF is an implementation of the
JAX-WS standard (i.e., Java standard for Web services, especially the kind of services that deal with SOAP protocol and WSDL documents). It is normally setup to run within
a servlet container such as Apache Tomcat through CXFServlet.
This lab assumes you have completed the set up necessary to carry out this exercise.
The set up procedure is described in Setting up your
Web service development environment for COMP9322.
HelloWorld with Apache CXF
To get ourselves a little bit more familiar with the tools, let's do another little HelloWorld exercise. This time, using Apache CXF.
Now we are going to run Maven and ask it to generate a project template for CXF Web service.
Through Maven Archetype, which is a template management tool that standardises the folder structure and artifacts of a project build, Apache CXF provides a project template called cxf-jaxws-javafirst. We will use it to quickly build and test out a Web service.
In a terminal window, navigate to your Eclipse workspace (e.g., mine is ~hpaik/workspace).
Type in the following (mind the ':' at the end) :
$ mvn archetype:generate -Dfilter=org.apache.cxf.archetype:
You will be prompted to 'Choose archetype: ' -- Enter number 2
(i.e., org.apache.cxf.archetype:cxf-jaxws-javafirst (Creates a project for developing a Web service starting from Java code))
Then you will be prompted to 'Choose a version: ' -- Enter number 99 (or you can try later versions)
Then you will be prompted to 'Define value for property groupId:' -- Enter au.edu.unsw.soacourse
Note: The groupId property in Maven is similar to Java package names ... Think of it as a way to group your applications (e.g., typically this could be by a department in an organisation, or an organisation itself - expressed in reversed domain name). We will use au.edu.unsw.soacourse as our groupId.
Then you will be prompted to 'Define value for property artifactId:' -- Enter HelloWorldCXF
Note: The artifactId property in Maven is similar to the title of your project/application.
Then you will be prompted to 'Define value for property version:'
-- Leave the value as-is, and hit enter
the default value here is 1.0-SNAPSHOT (case sensitive). It is just a conventional default value to define a version number.
Then you will be prompted to 'Define value for property package:'
-- Enter au.edu.unsw.soacourse.hello
This is just the Java package name the tool is going to produce for you.
- Maven will display all the values that have been set for the template and ask you to confirm by entering Y. Check the values and confirm.
Now Maven will generate the template code. You should see the 'BUILD SUCCESS' message in the terminal window. You should also see a new directory called 'HelloWorldCXF' under your workspace.
Let us import this into Eclipse IDE as an existing maven project and examine what has been generated.
Open Eclipse, and do File -> Import -> Maven -> Existing Maven Project. Navigate to HelloWorldCXF and complete the import process.
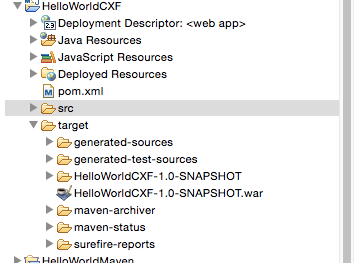
Open up the folders (as indicated in the picture below) and note the Java files and WEB-INF/*.xml files (of course, the pom.xml file as well).

Open HelloWorld.java -- You can see that it is an interface with one method called SayHi(). Note the name of the package imported javax.jws.WebService and the Java annotation @WebService.
Open HelloWorldImpl.java -- This implements the HelloWorld interface. Note the @WebService annotation - with a reference to an endpoint au.edu.unsw.soacourse.hello.HelloWorld.
All this leads to Apache CXF exposing the operation SayHi() as a Web service operation on an endpoint
Open web.xml. You see a servlet declaration named CXFServlet, whose implementation is provided by CXF org.apache.cxf.transport.servlet.CXFServlet.
In the same file, you also see a servlet mapping declaration which maps all URL patterns for this Web app to this servlet CXFServlet.
The configuration for the servlet CXFServlet is loaded from beans.xml. Inside beans.xml, you wil see an endpoint declaration id="helloWorld". You can see:
The endpoint is 'implemented by' -- the HelloWorldImpl, which has SayHi().
The endpoint is available at an address '/HelloWorld'.
The address is a relative URL from the web app root. That is, the full path is http:localhost:8080/HelloWorldCXF/HelloWorld, assuming that it is deployed locally on port 8080.
This template code is already complete and functional. Let's compile it.
First to compile and package the project:
Right click on the project name HelloWorldCXF. Do Run As -> Maven install.
You should see in the Console window a message 'Build Success'. Refresh the project, and you should see the target directory is now polulated with compiled code - and the final package 'HelloWorldCXF-1.0-SNAPSHOT.war' is produced.
You can also do this from a command line by typing in mvn install
Running the service
Now, we will first try to run this service locally using your locally installed Tomcat (managed via Eclipse), then deploy it to a Docker container running Tomcat/
Locally running and testing
Now to deploy the project onto Tomcat. Do the following:
If you haven't done so, create a new server configuration in Eclipse to work with your Tomcat 7 installation.
Right click on the new server (probably named something like 'Tomcat v.7 server at localhost'). Choose 'Add and Remove ...'. Add 'HelloWorldCXF' project and click 'Finish'
Start the Tomcat server
You should not see any error message on the Console view. We expect you to see something like (roughly):
INFO: Loading XML bean definitions from ServletContext resource [/WEB-INF/beans.xml]
INFO: Loading XML bean definitions from class path resource [META-INF/cxf/cxf.xml]
INFO: Creating Service {http://hello.soacourse.unsw.edu.au/}HelloWorldImplService from class au.edu.unsw.soacourse.hello.HelloWorld
INFO: Setting the server's publish address to be /HelloWorld
If you are not seeing this message, something has gone wrong. Try to fix it, come to the lab consultations, or post a question on the messageboard.
Let us see if the service is actually functional. Eclipse IDE has what is called 'Web Service Explorer'.
Go to Run -> Launch the Web Service Explorer. On the Explorer page, click the little icon 'WSDL page' (top-right corner, next to the yellow star icon).
On the Explorer, Navitator pane, click 'WSDL Main'. Enter 'http://localhost:8080/HelloWorldCXF/HelloWorld?wsdl', then click 'Go'
Click on Operation 'sayHi'
The 'sayHi' operation is expecting one argument. Click 'Add' next to arg0.
Type in a string value 'from Apache CXF' and click 'Go'
You should see the response from the Web service in the Status window.
Deploying to Docker
Now to deploy the project onto Tomcat container. Do the following:
As discussed in Setting up your
Web service development environment for COMP9322, start the Tomcat container from comp9322srv.
Open up a new Docker terminal and SSH to comp9322srv
Try the following command:
$docker ps$
You should see Tomcat container running.
Copy the war file into comp9322srv. Do the following command to copy the WAR file between machines
docker-machine scp the-path-to-your-workspace/HelloWorldCXF-1.0-SNAPSHOT.war comp9322srv: (note the ':' at the end)
You can see that the file now exists inside comp9322srv home directory. Check it with 'ls' command on comp9322srv.
Run the following command to deploy the HelloWorld application
$ docker cp the-path-to-your-WAR-file/HelloWorldCXF-1.0-SNAPSHOT.war tomcat8:/usr/local/tomcat/webapps/HelloWorldCXF.war
In the console that shows Tomcat output, we expect you to see something like (roughly):
INFO [localhost-startStop-2] org.apache.catalina.startup.HostConfig.deployWAR Deploying web application archive /usr/local/tomcat/webapps/HelloWorldCXF.war
INFO [localhost-startStop-2] org.springframework.web.context.ContextLoader.initWebApplicationContext Root WebApplicationContext: initialization started
INFO [localhost-startStop-2] org.springframework.context.support.AbstractApplicationContext.prepareRefresh Refreshing Root WebApplicationContext: startup date [Mon Feb 06 05:15:55 UTC 2017]; root of context hierarchy
INFO [localhost-startStop-2] org.springframework.beans.factory.xml.XmlBeanDefinitionReader.loadBeanDefinitions Loading XML bean definitions from ServletContext resource [/WEB-INF/beans.xml]
INFO [localhost-startStop-2] org.apache.cxf.wsdl.service.factory.ReflectionServiceFactoryBean.buildServiceFromClass Creating Service {http://hello.soacourse.unsw.edu.au/}HelloWorldImplService from class au.edu.unsw.soacourse.hello.HelloWorld
INFO [localhost-startStop-2] org.apache.cxf.endpoint.ServerImpl.initDestination Setting the server's publish address to be /HelloWorld
INFO [localhost-startStop-2] org.springframework.web.context.ContextLoader.initWebApplicationContext Root WebApplicationContext: initialization completed in 2144 ms
INFO [localhost-startStop-2] org.apache.catalina.startup.HostConfig.deployWAR Deployment of web application archive /usr/local/tomcat/webapps/HelloWorldCXF.war has finished in 4,038 ms
If you are not seeing this message, something has gone wrong. Try to fix it, or ask for help.
Let us see if the service is still functional. Test it the same say using Eclipse 'Web Service Explorer'.
Go to Run -> Launch the Web Service Explorer. On the Explorer page, click the little icon 'WSDL page' (top-right corner, next to the yellow star icon).
On the Explorer, Navitator pane, click 'WSDL Main'. Enter 'http://comp9322srv-ip:8888/HelloWorldCXF/HelloWorld?wsdl', then click 'Go'
Click on Operation 'sayHi'
The 'sayHi' operation is expecting one argument. Click 'Add' next to arg0.
Type in an input value (string) "from Apache CXF" and click 'Go'
You should see, in the Status window, the response "Hello from Apache CXF" returned from the Web service.
Building Simple Services
First, here is the user guide from Apache CXF web site.
The documentation gives a good overview of how to use CXF to build Web services. In this lab, we will go through some of the basic steps for building Web services.
There are two main approaches to Web service development:
- bottom-up approach (code first): taking your existing (Java) code and expose it as a Web service.
- top-down approach (contract first): starting from designing the service interface and writing
its WSDL.
In the rest of the lab exerises, we will briefly look at both.
Bottom-up (code first) Web service development
In the bottom-up development approach, we build a Web service by simply exposing
an existing Java class as a Web service. To do this, in Apache CXF, you take the following steps:
- Create a Service Endpoint Interface (SEI) that defines the methods you want to expose as a service.
- Add the required Java annotations to your code.
- Generate the WSDL contract for your service (optional)
- Publish the service as a service provider
In fact, we have seen the results of these steps in the exercise above (in HelloWorldCXF).
In there, we saw an example of an SEI. Go back and have a look at HelloWorld interface declaring sayHi() method in HelloWorld.java. We could consider HelloWorldImpl.java was the exiting Java class which contains the actual implementation of sayHi().
Note - Because the SEI is a standard Java interface, the class that implements it is a standard Java class. If you start with a Java class you must modify it to implement the interface. If you start with the SEI, you must provide an implementation class that implements the SEI.
In HelloWorldCXF, we published the service using CXFServlet (as an WAR file) to Tomcat container. We did not explicitly generate the matching WSDL contract, but we know that Apache CXF must have generated one based on the SEI because we could access it via the URL "localhost:8080/HelloWorldCXF/HelloWorld?wsdl". So, this is something to note as well. Apache CXF could produce its own version of WSDL based on the information given to it via the deployment process.
The 'automatic code generation' part for this bottom-up approach is based on the @WebService annotation added to the SEI and its implementation class. Note that, as you have seen from the HelloWorldCXF exercise, the @WebService annotation should be added to both the SEI and implementation class.
@WebService annotation specifies the metadata used to map the SEI to a fully specified service definition. For example, the SEI corresponds to a wsdl:portType element. The methods defined by the SEI correspond to wsdl:operation elements in the wsdl:portType element.
The properties associated with @WebService is explained here. It is not necessary to give a value to all of them. But you may as well test them out and see the effects.
Expose SimpleServices.java as a Web Service (code first)
Now, take this Java class (SimpleServices) and examine the content briefly.
Let us say this is your 'existing' java code that you want to expose as a Web service. Using the information given in the HelloWorldCXF exercise, create a Web service that exposes two methods (importMarketData(), downloadFile()) the in SimpleService class.
Now, using Maven archetype generation (interactive mode), generate some code template like you have done in the HelloWorldCXF exercise above.
Pay particular attentions to the following.
Use groupId=au.edu.unsw.soacourse, artifactId=SimpleServices, package=au.edu.unsw.soacourse.simple
- Using the HelloWorld.java and HelloWorldImpl.java as example, create your own SimpleServices.java and SimpleServicesImpl.java.
Apache CXF relevant libraries for this exercise are already configured with Maven (pom.xml) so those will be included in the class path for compiling and packaing.
In pom.xml, perform two things:
- the default Java compiler version is 1.6. Make it to use version 1.7 instead. Look for the following XML configuration part:
 <plugin>
  <groupId>org.apache.maven.plugins</groupId>
    <artifactId>maven-compiler-plugin</artifactId>
      <configuration>
        <source>1.6</source> -> change to 1.7
        <target>1.6</target> -> change to 1.7
      </configuration>
  </plugin>
- I'd remove the following plug-in (remove the whole <plugin> block), as we do not need it at all.
 <plugin>
       <!-- mvn clean install tomcat:run-war to deploy
       Look for "Running war on http://xxx" and
       "Setting the server's publish address to be /yyy"
        in console output; WSDL browser address will be
        concatenation of the two: http://xxx/yyy?wsdl
        -->
        <groupId>org.apache.tomcat.maven</groupId>
          <artifactId>tomcat7-maven-plugin</artifactId>
            <version>2.0</version>
               <executions>
                   <execution>
                       <id>start-tomcat</id>
                       <goals>
                           <goal>run-war</goal>
                       </goals>
                       <phase>pre-integration-test</phase>
                       <configuration>
                           <port>${test.server.port}</port>
                           <path>/webservice</path>
                           <fork>true</fork>
                           <useSeparateTomcatClassLoader>true</useSeparateTomcatClassLoader>
                       </configuration>
                   </execution>
               </executions>
</plugin>
- Save pom.xml and run 'Update Project' by Right clicking on the project root folder -> Maven -> Update Project.
Configure, in the beans.xml file, the jaxws:endpoint element.
You can add an extra jaxws:endpoint element to the beans.xml file, using the existing one as an example. Set the address of the service, and also the implementor class correctly.
Run Maven install, and copy the project to Tomcat container to deploy.
Test the service operations using the Web Service Explorer in Eclipse.
Topdown (contract first) Web service development
Although the bottom-up approach gives you a way to expose an existing Java class as a Web service quickly, the final product is not as flexible as a service you create from scratch. Using the 'topdown (contact first)' approach, you are required to 'think' about what the new service is 'going to do' first (i.e., what is client going to get from your service?).
Here, we will define the functionality in an abstract manner first, then implement the functionality.
Of course, we design/write the service contract in WSDL. We are going to add new service to the existing project from the previous exercise 'SimpleServices'. This time, we are going to implement the same service operations using the contract-first approach.
Design and Build SimpleServices.java from WSDL (contract first)
-
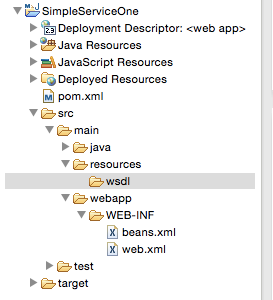
First, you should add new folders under src/main to house the WSDL file. It should look like this (src/main/resources/wsdl).
You might have to update project again to make sure that Maven knows about the new project folders
Use the WSDL editor provided by Eclipse IDE. Right click on the folder 'src/main/resources/wsdl'. Go to New -> Other -> Web Services -> WSDL.
Name the file 'TopDownSimpleService.wsdl'.
In the next window, set the Target Namespace for the WSDL as 'http://topdown.soacourse.unsw.edu.au'
Leave the following settings as they are:
- Protocol - SOAP
- SOAP binding option - document/literal.
Now you have a simple skeleton of a WSDL file. We DO NOT recommend the graphical view (the 'Design' view) of the editor. Just use the XML view directly (the 'Source' view). It is easier that way.
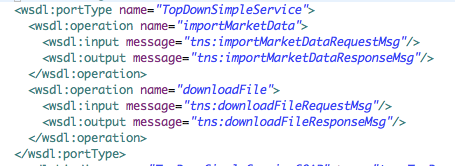
Let us think what what we are going to change here. Examine SimpleServices.java again. The service has two operations: importMarketData() and downloadFile().
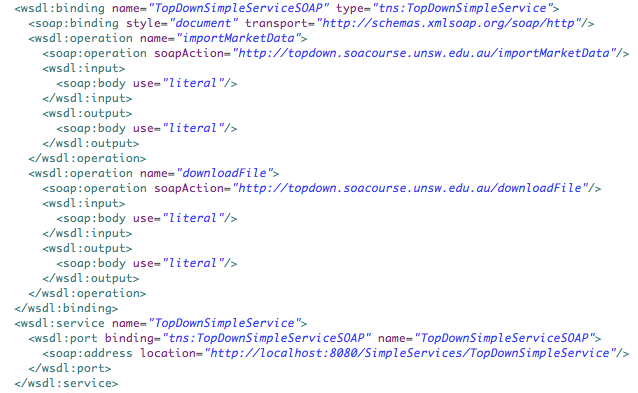
Go to 'portType' element in WSDL. This is where we will define the two operations their input/output messages. Change the skeleton code so that it looks like this:
Note: the content is provided as an image rather than text so that you will have to type the content in yourself. This is because it is rather important that you understand this individual XML elements and what each stands for. So, pay attention to what you are typing in.
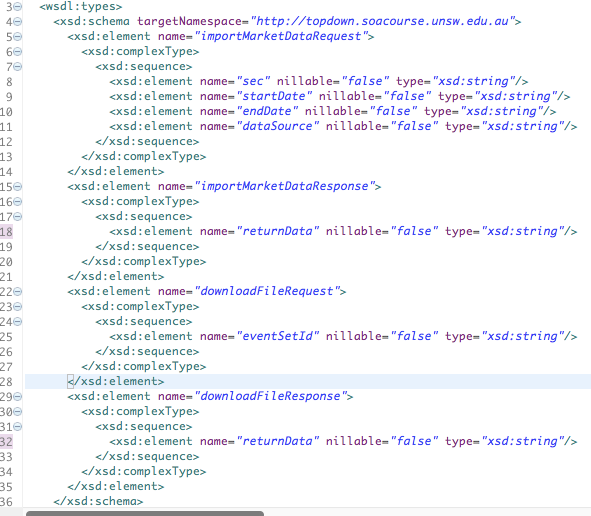
Now, go to 'message' elements. Here, we will detail the messages we named in the operations in the potyType element. Let us say every message we use will have one part (a single XML fragment).
Change the skeleton code so that it looks like this:

We will then detail what each part in the message looks like. That is, we will define the XML elements: importMarketDataRequest, importMarketDataResponse, downloadFileRequest, downloadFileResponse.
Go to 'types' element. Change the skeleton code of the 'schema' section like this:
Go to 'binding' and 'service' elements. Change the skeleton code of the sections like this:
Now validate the finished WSDL. Right click on the WSDL file -> Validate. See if everything is OK. If there is any error, fix the error before you proceed.
From the contract written (i.e., the WSDL), the Apache CXF tools will auto-generate some code. First let us run the tool and examine the results.
Open the pom.xml file. Enter the following <plugin> declaration
into the 'build' element (i.e., DIRECTLY BELOW the build element and above the pluginManagement element).
By doing this, you are adding a Maven plug-in from Apache CXF for
code generation (cxf-codegen-plugin).
This plug-in runs WSDL2Java which is the actual tool
that generates code from WSDL.
This plug-in will run as a new goal 'generate-sources', which means
you can also execute it using 'mvn generate-sources' in the command line, or from Run As -> Maven -> mvn generate-sources.
     <plugins>
        <plugin>
                <groupId>org.apache.cxf</groupId>
                <artifactId>cxf-codegen-plugin</artifactId>
                <version>3.0.4</version>
                <executions>
                  <execution>
                    <id>generate-sources</id>
                    <phase>generate-sources</phase>
                  <configuration>
                      <sourceRoot>src/main/java-generated</sourceRoot>
                      <wsdlOptions>
                          <wsdlOption>
                              <wsdl>${basedir}/src/main/resources/wsdl/TopDownSimpleService.wsdl</wsdl>
                          </wsdlOption>
                      </wsdlOptions>
                  </configuration>
                  <goals>
                      <goal>wsdl2java</goal>
                  </goals>
                  </execution>
                </executions>
      </plugin>
    </plugins>
Save pom.xml and update the project by right clicking on the project root -> Maven -> Update Project.
Now run wsdl2java. Right click on the project root -> Run As -> Maven generate-sources. You should see 'Build Success' message in the console. Refresh the project do see the new generated content. The new source code should be under src/main/java-generated.
Examine the Java source files quickly. You will see the classes that represent request/response message parts in Java objects (e.g., ImportMarketRequest.java). Notice the ObjectFactory.java file and examine the content. An ObjectFactory allows you to programatically create new instances of the Java representation of the XML message parts we see (e.g., createImportMarketDataRequest() method).
The next file to look at is the SEI (service endpoint interface) file for the service itself (TopDownSimpleService.java). WSDL2Java has mapped the definitions available in the WSDL to the interface using annotations. You can get more information about those extra annotations that you see here at Apache CXF documentation page.
Your task is to implement the SEI by creating and completing TopDownSimpleServiceImpl.java. You may have a look at this file - but try to code this yourself as an exercise.
After coding is done, you are ready to configure the service and deploy it.
Replace the beans.xml file with this version given.
Then, open the file - you should notice the two things:
- The following line just below <import resource="classpath:META-INF/cxf/cxf.xml" />
<context:component-scan base-package="au.edu.unsw.soacourse.topdown"/>
Note: Java Spring context 'component-scan' - adding this will automatically scan the specified package space to recognise any new beans to be included.
- A new jaxws:endpoint for the new TopDownSimpleService declared:
<jaxws:endpoint
   id="topdown"
   implementor="au.edu.unsw.soacourse.topdown.TopDownSimpleServiceImpl"
   address="/TopDownSimpleService"/>
Double check that you are comfortable with the endpoint address, and the path to the implentor class.
- Run Maven Install and copy it to Tomcat container. Test the new service using Web Service Explorer.
Docker exercise
Deploy the TopDownSimpleService implementaiton to the Docker container and test it with Web Service Explorer.
Summary
In this lab, we have looked at two ways to buid a Web service using Apache CXF.