
Due: Friday 20 October, 23:59 pm
Marks: 20% of final assessment
In this assignment, you will be implementing and training neural
network models for three different tasks, and analysing the results.
You are to submit two Python files
kuzu.py and check.py, as well as a written report
hw1.pdf (in pdf format).
Copy the archive hw1.zip into your own
filespace and unzip it. This should create a directory hw1,
subdirectories net and plot, and eight Python files
kuzu.py, check.py, kuzu_main.py,
check_main.py, seq_train.py,
seq_models.py, seq_plot.py and anb2n.py.
Your task is to complete the skeleton files
kuzu.py and check.py
and submit them, along with your report.
NetLin
which computes a linear function of the pixels in the image,
followed by log softmax.
Run the code by typing:
python3 kuzu_main.py --net linCopy the final accuracy and confusion matrix into your report. The final accuracy should be around 70%. Note that the rows of the confusion matrix indicate the target character, while the columns indicate the one chosen by the network. (0="o", 1="ki", 2="su", 3="tsu", 4="na", 5="ha", 6="ma", 7="ya", 8="re", 9="wo"). More examples of each character can be found here.
NetFull
(i.e. one hidden layer, plus the output layer),
using tanh at the hidden nodes and log softmax at the output node.
Run the code by typing:
python3 kuzu_main.py --net fullTry different values (multiples of 10) for the number of hidden nodes and try to determine a value that achieves high accuracy (at least 84%) on the test set. Copy the final accuracy and confusion matrix into your report, and include a calculation of the total number of independent parameters in the network.
NetConv, with two convolutional layers
plus one fully connected layer, all using relu activation function,
followed by the output layer, using log softmax.
You are free to choose for yourself the number and size
of the filters, metaparameter values (learning rate and momentum),
and whether to use max pooling or
a fully convolutional architecture.
Run the code by typing:
python3 kuzu_main.py --net convYour network should consistently achieve at least 93% accuracy on the test set after 10 training epochs. Copy the final accuracy and confusion matrix into your report, and include a calculation of the total number of independent parameters in the network.
python3 check_main.py --act sig --hid 6You may need to run the code a few times, until it achieves accuracy of 100%. If the network appears to be stuck in a local minimum, you can terminate the process with ⟨ctrl⟩-C and start again. You are free to adjust the learning rate and the number of hidden nodes, if you wish (see code for details). The code should produce images in the
plot subdirectory graphing the function computed by each hidden node (hid_6_?.jpg) and the network as a whole (out_6.jpg).
Copy these images into your report.
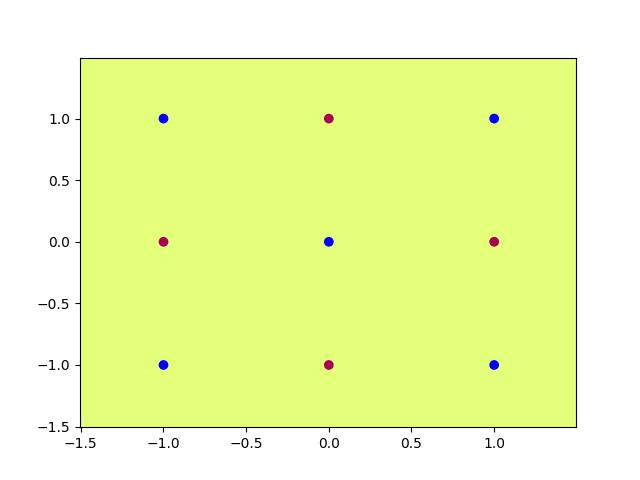
check.py where it says "Enter Weights Here", and typing:
python3 check_main.py --act step --hid 4 --set_weights
python3 check_main.py --act sig --hid 4 --set_weightsOnce again, the code should produce images in the
plot subdirectory
showing the function computed by each hidden node (hid_4_?.jpg)
and the network as a whole (out_4.jpg).
Copy these images into your report, and be ready to submit check.py
with the (rescaled) weights as part of your assignment submission.
seq_train.py,
seq_plot.py and anb2n.py.


python3 seq_train.py --lang anb2nThe anb2n language is a concatenation of a random number of A's followed by exactly twice that same number of B's. The generator produces concatenations of sequences anb2n for values of n between 1 and 4. This SRN has 2 inputs, 2 hidden nodes and 2 outputs.
Look at the predicted probabilities of A and B as the training progresses. The first B in each sequence and all A's after the first A are not deterministic and can only be predicted in a probabilistic sense. But, if the training is successful, all other symbols should be correctly predicted. In particular, the network should predict the last B in each sequence as well as the subsequent A. The loss should be consistently below 0.05 (you might need to run the code a couple of times in order to achieve this). After the training finishes, plot the hidden unit activations at epoch 100000 by typing:
python3 seq_plot.py --lang anb2n --epoch 100This should produce text output showing the hidden unit activations and associated probabilities, as each sequence is processed; it should also produce an image in the
plot
subdirectory called anb2n_srn2_01.jpg.
Copy this image into your report.

python3 seq_train.py --lang anb2nc3n --model lstm --hid 3The anb2nc3n language is a concatenation of a random number of A's, followed by exactly twice that same number of B's, followed by three times that number of C's.
The error rate should be consistently below 0.02, and the network should be correctly predicting the non-initial B's, all the C's, and the subsequent A following the last C. You might need to run the code a couple of times in order to achieve this. If the network appears to have already learned the task successfully, or if it seems to be stuck in a local minimum, you can terminate the process with ⟨ctrl⟩-C (and start again, if necessary). After the training finishes, plot the hidden unit activations at epoch 50000 by typing:
python3 seq_plot.py --lang anb2nc3n --model lstm --epoch 50(you can choose a different epoch number, if you wish). This should produce three images labeled
anb2nc3n_lstm3_??.jpg.
Copy these images into your report.
You should submit by typing
give cs9444 hw1 kuzu.py check.py hw1.pdf
You can submit as many times as you like — later submissions will overwrite earlier ones. You can check that your submission has been received by using the following command:
9444 classrun -check hw1
The submission deadline is Friday 20 October, 23:59pm. In accordance with UNSW-wide policies, 5% penalty will be applied for every 24 hours late after the deadline, up to a maximum of 5 days, after which submissions will not be accepted.
Additional information may be found in the FAQ and will be considered as part of the specification for the project. You should check this page regularly.
Group submissions will not be allowed for this assignment. Your code and report must be entirely your own work. Plagiarism detection software will be used to compare all submissions pairwise (including submissions for similar assignments from previous offering, if appropriate) and serious penalties will be applied, particularly in the case of repeat offences.
DO NOT COPY FROM OTHERS; DO NOT ALLOW ANYONE TO SEE YOUR CODE
Please refer to the UNSW Policy on Academic Integrity and Plagiarism if you require further clarification on this matter.
Good luck!