GDB - Init File
Learning Outcome
Able to add basic commands to a .gdbinit file as default commands (e.g. breakpoints) to avoid entering them every debug session.
Able to write advanced user-defined GDB commands, and use them to debug more complex data structures including linked lists and binary trees.
Introduction
Often it is tedious to debug complex data structures. Debugging a linked list often requires printing a node by dereferencing the pointer to its struct, then accessing the next node and doing the same to it. This can become tedious and messy, resulting in commands like:
(gdb) print *(curr)
(gdb) print *(curr->next)
(gdb) print *(curr->next->next)
...
However, a command to print out a linked list can be created and placed inside the .gdbinit file.
Applicable subjects
COMP2521, COMP3231
GDB User Initialization File
The user initialization file contains commands that are executed upon the startup of GDB. It is located in your home directory under the path:
~/.gdbinit
Create/edit this file and add the following line to this file:
set auto-load safe-path /
This allows our programs to use a current directory initialization file, i.e. you can create a .gdbinit for each project you’re debugging.
GDB Current Directory Initialization File
The current directory initialization file contains commands to be executed upon the startup of GDB within the current directory.
~/<file_path>/.gdbinit
Create/edit this file to contain any startup behaviour and user defined commands. Use either standard gdb commands or the GDB scripting syntax (which is described below).
Basic Use
.gdbinit files can be used to always execute commands when you run GDB in a particular directory. For example, if you always want to break at a certain function (for those doing OS, this might be the panic() function) then you can place the following in the file:
break <function_name>
GDB Scripting Syntax
Define a command
You can create a user defined command in the .gdbinit file:
define <command>
    <code>
end
Document a command:
You can document a command in the .gdbinit file:
document <command>
    <information about the command>
end
This information appears when the help feature is used:
(gdb) help <command>
<information about the command>
Parameters
When a user defined command is called in GBD, arguments can be passed in:
(gdb) <command> <arg0> <arg1> <arg2> ...
The number of arguments, and the arguments themselves can be referenced inside the command definition using the following variables:
$argc
$arg0
$arg1
$arg2
...
Convenience Variables
Convenience variables are used to store variables as your script runs. They are specified by putting a ‘$’ in front of a name (note there are some reserved names, such as $1):
$<variable_name>
Note, gdb scripting uses one flat namespace - which makes recursion difficult. To use recursion you must use unique names for each of the variables in each stack frame. This can be generated using a name base, plus the value of another variable, separated by an underscore:
$<name_base>_$<other_variable>
Setting a variable
You can set the value of a variable using the set command:
set $<variable_name> = <value_or_expression>
If statements
If statements can be used to conditionally execute GDB commands/ scripts:
if <condition>
    <code>
else
    <code>
end
While Loops
While loops can be used to repeat a section of code for as long as a condition is true:
while <condition>
    <code>
end
Printing
Printing in GDB scripting is very similar to printing in c:
printf "<format string>", <arg0>, <arg1>, ...
Using a User Defined Command
User defined commands are used in the same way as non-user defined commands (such as print). Within gdb, the command name is specified followed by any arguments the command definition requires
(gdb) <command> <arg0> <arg1> <arg2> ...
Examples
Break on a given function every time
OS/EOS students will want to always break on panic() so that when there is an error, the program halts and gdb can be used. There are several things that are required in the .gdbinit file for OS, one of which being a break on panic.
Place the following in the ~/.gdbinit file. This lets GDB use the commands in ./~gdbinit.
set auto-load safe-path /
Place the following in GDB in the ./~gdbinit file. This breaks when the panic function is called.
break panic
Having these two files is effectively like running break panic when GDB is first started. GDB can then be used as normal, and when panic() is called, the execution is automatically stopped.
Debugging Linked lists
There are two main ways to debug code containing linked lists in GDB. You can manually go through and print each node in the linked list (which can become tedious), or you can write a script to do it for you. In this example, we will learn how to write a GDB script to traverse the linked list given in linked_list.c.
1 2 3 4 5 6 7 8 9 10 11 12 13 14 15 16 17 18 19 20 21 22 23 24 25 26 27 28 29 30 31 32 33 34 35 36 37 38 39 40 41 42 43 44 45 46 47 48 49 50 51 52 53 54 55 | //Makes a linked list of length 7 and prints it out
#include <stdio.h>
#include <stdlib.h>
#include <assert.h>
struct node {
int data;
struct node *next;
};
struct node *create_node(int data);
struct node *create_list(int length);
void print_list(struct node *list);
int main(void){
struct node *list1 = create_list(7);
print_list(list1);
return 0;
}
struct node *create_node(int data){
struct node *new = malloc(sizeof(struct node));
assert(new != NULL);
new->data = data;
new->next = NULL;
return new;
}
struct node *create_list(int length) {
struct node *head = NULL;
if (length > 0) {
head = create_node(0);
int i = 1;
struct node *curr = head;
while (i < length) {
curr->next = create_node(i);
curr = curr->next;
i++;
}
}
return head;
}
void print_list(struct node *list){
struct node *curr = list;
while (curr != NULL) {
printf("%d->", curr->data);
curr = curr->next;
}
printf("X\n");
}
|
Place the following in the ~/.gdbinit file:
set auto-load safe-path /
Place the following script to print out a linked list in GDB in the ./~gdbinit file:
1 2 3 4 5 6 7 8 9 10 11 12 13 14 15 16 17 18 19 20 21 22 23 | define p_generic_list
set var $n = $arg0
while $n
print *($n)
set var $n = $n->next
end
end
document p_generic_list
p_generic_list LIST_HEAD_POINTER
Print all the fields of the nodes in the linked list pointed to by LIST_HEAD_POINTER. Assumes there is a next field in the struct.
end
define indentby
printf "\n"
set $i_$arg0 = $arg0
while $i_$arg0 > 10
set $i_$arg0 = $i_$arg0 - 1
printf "%c", ' '
end
end
|
This script is the same as a C program to print out a linked list, excluding a few key syntax differences.
We want our script to traverse the list given in the first argument to the command ($arg0). So we create a convenience variable to store our current pointer and set it to $arg0:
set var $n = $arg0
We might want to change our node structure later on, so we create a command that will print out every field in the node, regardless of what it is. We do this by using the gdb command print on the dereferenced nodes (we could use printf, but we would have to individually specify each field).
print *($n)
The only part of the linked list node that we assume will always be present is the next pointer, which we use to move through our program in the line :
set var $n = $n->next
When our p_generic_list command is run in gdb, it prints out all of the nodes until it reaches a NULL:
$ gcc -g -o linked_list linked_list.c
$ gdb -q ./linked_list
(gdb) br 18
Breakpoint 1 at 0x40061c: file linked_list.c, line 18.
(gdb) r
Starting program: /mnt/d/code/debugging/modules/linked_list
Breakpoint 1, main () at linked_list.c:18
18          print_list(list1);
(gdb) p_generic_list list1
$1 = {data = 0, next = 0x602030}
$2 = {data = 1, next = 0x602050}
$3 = {data = 2, next = 0x602070}
$4 = {data = 3, next = 0x602090}
$5 = {data = 4, next = 0x6020b0}
$6 = {data = 5, next = 0x6020d0}
$7 = {data = 6, next = 0x0}
(gdb)
Debugging Binary Trees
Debugging binary trees can be even more tedious than debugging linked lists, because there is no one, easy path to print it out. This is where a script can be used, to print out a BST graphically.
The following code was adapted from lab 3 of COMP2521, which is just one of many direct applications of GDB in your coursework. All these files do is create a simple BST, which we will then print out in 2D using GDB.
btree.c
btree.h
test_btree.c
.gdbinit
1 2 3 4 5 6 7 8 9 10 11 12 13 14 15 16 17 18 19 20 21 22 23 24 25 26 27 28 29 30 31 32 33 34 35 36 37 38 39 | //An implementation of a binary search tree
#include <stdio.h>
#include <stdlib.h>
#include <assert.h>
#include "btree.h"
struct treeNode {
TreeItem item;
treelink left;
treelink right;
};
static treelink createNode(TreeItem item){
treelink t = (treelink) malloc (sizeof (*t));
t->item = item;
t->left = NULL;
t->right = NULL;
return t;
}
//This function inserts duplcates on the left
treelink insertTreeNode (treelink tree, TreeItem item) {
if (tree == NULL) {
tree = createNode(item);
tree->item = item;
tree->left = NULL;
tree->right = NULL;
} else if (tree->item < item) {
tree->right = insertTreeNode (tree->right, item);
} else {
tree->left = insertTreeNode (tree->left, item);
}
return tree;
}
|
1 2 3 4 5 6 7 8 | typedef int TreeItem;
typedef struct treeNode * treelink;
//Functions that are provided
treelink insertTreeNode (treelink tree, TreeItem item);
|
1 2 3 4 5 6 7 8 9 10 11 12 13 14 15 16 17 18 19 20 21 22 23 24 | #include <stdio.h>
#include <stdlib.h>
#include <assert.h>
#include "btree.h"
int main (int argc, char *argv[]) {
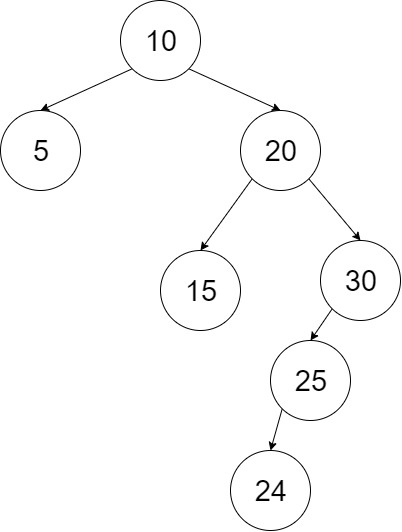
treelink t1 = insertTreeNode (NULL, 10);
insertTreeNode (t1, 20);
insertTreeNode (t1, 5);
insertTreeNode (t1, 30);
insertTreeNode (t1, 15);
insertTreeNode (t1, 25);
insertTreeNode (t1, 24);
printf("We can test our tree here\n");
return EXIT_SUCCESS;
}
|
Place the following in the ~/.gdbinit file:
set auto-load safe-path /
Place the following script to print out a 2D BST in GDB in the ./~gdbinit file:
1 2 3 4 5 6 7 8 9 10 11 12 13 14 15 16 17 18 19 20 21 22 23 24 25 26 27 28 29 30 31 32 33 34 35 36 | define indentby
printf "\n"
set $i_$arg0 = $arg0
while $i_$arg0 > 10
set $i_$arg0 = $i_$arg0 - 1
printf "%c", ' '
end
end
define draw_sideways_btree
set $node_$arg0 = ($arg1)
set $leftid_$arg0 = $arg0 + 1
set $rightid_$arg0 = $arg0 + 2
set $space_$arg0 = ($arg2) + 10
if $node_$arg0->right
        draw_sideways_btree $rightid_$arg0 $node_$arg0->right $space_$arg0
end
indentby $space_$arg0
printf "%d\n", $node_$arg0->item
if $node_$arg0->left
        draw_sideways_btree $leftid_$arg0 $node_$arg0->left $space_$arg0
end
end
define start_draw_sideways_btree
draw_sideways_btree 0 $arg0 0
end
document start_draw_sideways_btree
start_draw_sideways_btree ROOT_POINTER_NAME
Draw a sideways representation of the binary tree pointed to by ROOT_POINTER_NAME
end
|
The easiest way to print out a 2D tree (and the approach taken in the script above) is a rotated anticlockwise tree because that uses a simple reverse inorder traversal.
However, most implementations of this require recursion - which becomes difficult with a flat namespace (like the one in GDB scripting).
To use a recursive approach, we will need unique names for each of the convenience variables. These can be created by appending the node number to a base variable name. For example:
$node_$arg0
The standard reverse indorder traversal is as follows:
If the right node is not NULL, call the function on the right node.
if $node_$arg0->right
draw_sideways_btree $rightid_$arg0 $node_$arg0->right $space_$arg0
end
Print out spaces (the number of spaces printed increases by 10 with each level down the tree).
indentby $space_$arg0
Print out the data in the current node
printf "%d\n", $node_$arg0->item
If the left node is not NULL, call the function on the right node
if $node_$arg0->left
draw_sideways_btree $leftid_$arg0 $node_$arg0->left $space_$arg0
end
We can then run our start_draw_sideways_btree command on our BST.
$ gcc -g -o test_btree test_btree.c btree.c
$ gdb -q ./test_btree
Reading symbols from ./test_btree...done.
(gdb) br 17
Breakpoint 1 at 0x4005ee: file test_btree.c, line 17.
(gdb) r
Starting program: /mnt/d/code/debugging/modules/test_btree

Breakpoint 1, main (argc=1, argv=0x7ffffffee118) at test_btree.c:19
19          printf("We can test our tree here\n");
(gdb) start_draw_sideways_btree t1

                    30

                              25

                                        24

          20

                    15

10

          5
A sideways representation of our tree is produced. The implicit links between the nodes are illustrated below:
                    30
                   .      .
                 .            25
               .                  .
             .                        24
           .
          20
       .         .
    .               15
 .
10
     .
          5
Which, when we rotate to be the correct way up becomes:
Module author: Liz Willer <e.willer@unsw.edu.au>
- Date
2020-01-21